
Whoa, Trigger! Fixing Those Shot Groups That Go South
Do you sometimes leave the handgun range frustrated with shot groups that are always lower than where you intended them to be? If so, you’re part of a very big club! Generally, such low groups trend left for right-handed shooters and right for left-handed shooters; a few will have the groups go low at the six o’clock position.
Regardless, if you’re part of the “South Group Club,” the following will work to help you get into the smaller, happier club of people whose shots group together in the center of the target.
They’re techniques I use to help new and average shooters become competent shooters, but because no one trick works with everyone, I’m including the top three examples that have worked with the different learning styles I’ve encountered with my students. They are listed in order of most to least often successful, but they’ve all worked and often with a low investment of rounds and time.
For brevity, these instructions refer primarily to semiauto pistols. With some commonsense modifications, they also work with revolvers.
Targets set at five yards for any of these drills is a good starting place for beginners, seven yards for more confident shooters. The target area should be quite small; I suggest a 1.5-inch square at largest.
The aiming technique is consistent for each drill and one you’re likely familiar with, but it bears repeating so that we’re all on the same page:
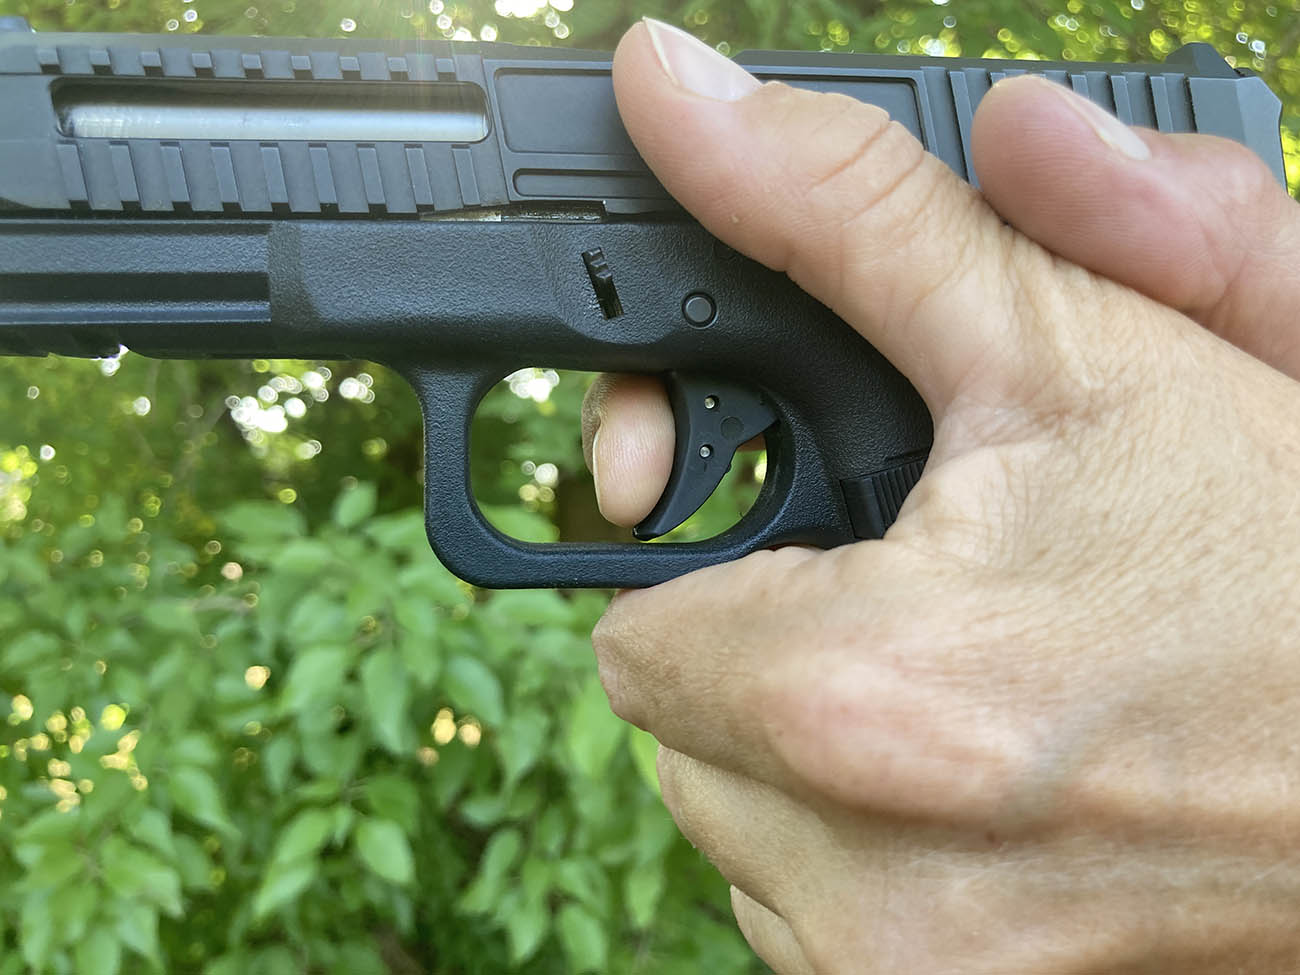
1. Align the rear and front sights so that the top of the front sight is level with the top of the rear and there is equal daylight on each side of the front sight post.
2. Superimpose those sights (or red dot) over the center of the small bull’s-eye.
3. With the rear and front sight (or red dot) correctly oriented over the center of the target, focus your eyes on the front sight (or the dot). The rear sight and target will be blurred. Focusing on the front sight and not the target is counterintuitive, but it works.
And with that, let’s get to those drills.


The Max Michel Drill
I named this drill after watching a demo by professional shooter Max Michel. It’s a variation on the old live-and-dummy-round drill, but this one works better for most people. To start:
1. Load the pistol by inserting a loaded magazine and racking or closing the slide.
2. Remove and stow the magazine.
3. Align the sights and acquire a sight picture.
4. Press off the first shot. Assuming your focus was correct, you’ll be able to confidently state where the front sight was in relation to the target—“calling the shot”—at the moment of firing.
5. Maintain a solid grip and look for that perfect sight picture, focusing on the front sight.
6. Press off the next shot, again calling the shot in terms of where the front sight was when the gun went “click.”
After five to seven reps of the Max Michel drill, a majority of shooters begin to understand what they’re physically doing: flinching. However slight it may be, that’s what’s causing shots to go low.
Did this work for you? If not, try the next one.
Five Percent at a Time
It is Kyle Defoor of Defoor Proformance Shooting to whom I’m indebted for this one. There are two parts to this drill. This first part involves finding your trigger’s wall:
- Take aim on the bull’s-eye with the loaded gun.
- With your finger on the trigger, take out any slack or excess travel your trigger may have. Striker-fired pistols usually have about ¾ inch of free travel before reaching a palpable “wall,” that place just a fraction away from breaking the trigger. Most 1911 or 2011 pistols have a much shorter trip to that point. Wherever it is on your gun, stop at that wall. Note: Some hammer-fired handguns, including most double-action-only models, lack that slack feeling in the trigger, as the weight of the hammer is felt through the entire trigger stroke. For these, press out about ¾-inch of travel and stop.
Let’s call the wall or ¾-inch point the 50-percent mark. Now, keeping your focus on the front sight, press the trigger to 55 percent, then 60, 65, and so on until the shot breaks. If a person is able to make their finger move in five-percent increments, the shot usually breaks somewhere between 60 and 70 percent.
Remember that the best shots in any of these drills will be a surprise. Good shooting is simply keeping the sights on target until the shot is history. It’s simple but not always easy, so this meticulous approach to the trigger break, one that has you hard focused on that proper sight picture, can help fix a flinch.
I’ve further adapted this drill for some shooter and gun combos. Sometimes we go to “50 cents” (the wall), then, depending on the type of trigger, add one nickel-, penny-, or dime-weight of pressure on the trigger at a time. Pretty much everyone can picture how much weight a single coin, then another, and another, would feel like were one to rest on the pad of the trigger finger, and gradually increasing such incremental weight to the trigger in this manner helps accomplish the goal of reducing flinch.
The Control-Your-Amygdala Drill
Credit goes to sports psychologist Jane Pike for the phrase “control your amygdala.” Jane runs confidentrider.online and works primarily with equestrians and their horses who have issues, but the phrase arose from her experience rock-climbing. It references the brain’s amygdala, “commonly thought to form the core of a neural system for processing fearful and threatening stimuli.”
Some people have a high need to understand how and why a problem happens before they can fix it. Turns out those low-slung shot groups are actually evidence of our survival instinct! In the absence of formal training, the part of the brain that deals with sudden threats jumps into action for every shot. That’s where the amygdala comes in. Its job is to keep you alive without you having to think about it. At the moment the shot breaks, the amygdala perceives an emergency—there is, after all, a small explosion happening right in front of your face and between your hands. It takes only a couple shots for the memory aspect of the brain to get in on the act, too. Now, the act of pressing the trigger is infused with the anticipation of stress. Often, the shooter’s eyes automatically close or squint when the shot breaks, which would make sense in the event of an unwanted explosion. The hands also get caught up in the “emergency.” Typically, the trigger finger delivers a spastic motion of some scale. I find it helps to explain that it would be reminiscent of the feeling you had that first time you jumped off a high dive. At some point you said, “Oh, heck, let’s get this over with,” and jumped without much of a plan. When trigger fingers “jump,” or flinch, shots go low. The stress-induced error may also involve the wrists or other fingers, but the trigger finger is usually the culprit. Your lack of a plan—focusing on the sight picture and a proper trigger pull—isn’t limited to the trigger pull. It also results in the failure to follow through with the shot when you don’t look for the post-recoil sight picture.
Once the need-to-know shooter understands the source of that flinch, a remedy can be enacted and, as you might imagine, this is a mental one more than a physical technique. You must make a conscious and firm decision that your trigger finger is the slave of the intentional, thinking side of the brain and not the random response of the amygdala you’ve thus far let take over. Sometimes it’s also helpful to remember that the shot is not the end of the shooting cycle. Rather it’s the reacquired sight picture that completes all of your motions in making a shot (and the next one, and the next one) count.
If you’ve suffered the disappointment of shot groups gone south, give at least one of these methods a try. When you’ve overcome this most common shooting error, give yourself a pat on the back and move on to the next challenge.
Save Your Thumbs
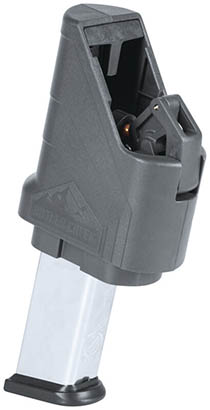
Whether you’re slow-mo’ing it through one of Eve’s careful drills for flinch cure or sending brass flying at an IPSC match, you need loaded magazines. I’ve loaded up hundreds, maybe thousands of magazines over the decades, and I can tell you that, with few exceptions, they were a total pain in the neck. Double-stacks were the worst. What I needed and didn’t have was an ASAP Universal Double Stack Loader from Butler Creek.
Honestly, this loader puts any other one I ever tried to shame. It is nearly effortless in use, solid in construction, and loads almost any double-stack design from .380 ACP to .45 ACP. If a single-stack mag reloading is the bane of your existence, there’s an ASAP for that too.—Jennifer L.S. Pearsall
A Little Sizzle (and Pancakes, Too!)
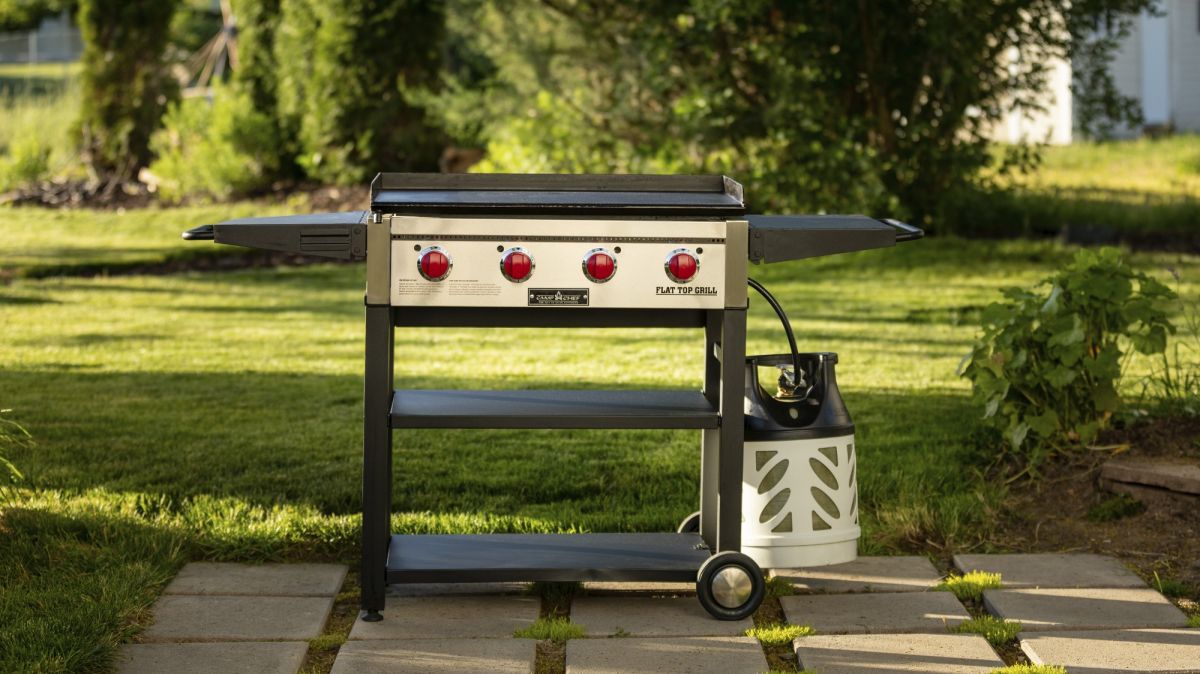
Shooting well takes focus, especially when working through drills like those Eve suggests that work to correct or improve technique. That focus, in return, requires a well-balanced physicality: You need to be hydrated and have enough nutrition in you to fend off waning energy, something that’s particularly important when you’re range time is during hot summer weather.
We suggest you get a jumpstart on the nutrition part with some sausage, eggs, and maybe a flapjack or two via the Flat Top Grill 600 from Camp Chef. This cooking vessel heats up quickly and evenly—no hotspots that produce uneven cooking— with a 48,000 BTU output, and it runs off propane with a matchless ignition system. More than 600 square inches of surface can feed one or a dozen, the side tables on either end fold down for easy storage. Best of all, the True Seasoned Surface means you get a non-stick cooking plane that you can use without worry the first time you fire up, and when you’re done with breakfast and ready for evening steaks, remove the flattop to reveal a full-width grill grate.—Jennifer L.S. Pearsall


